Summary
This guide provides step-by-step instructions on how to install and configure Docker on Jailmaker. It includes setting up Docker, configuring network interfaces, and ensuring proper dataset organization and permissions. This guide is intended for users who are familiar with TrueNAS Scale and Docker.
Table of Contents
Prerequisites
Before proceeding, ensure you have installed Jailmaker using the guide here.
You also need to know your network interface.
Network Interface Identification
- Navigate to the Network section in the TrueNAS Scale GUI.
- Identify your network interface:
- Simple Interface Example:
- In this example the interface name: eno1
- Simple Interface Example:
- Bridge Interface Example:
- In this example the interface name: br0
- Bridge Interface Example:

Dataset Creation
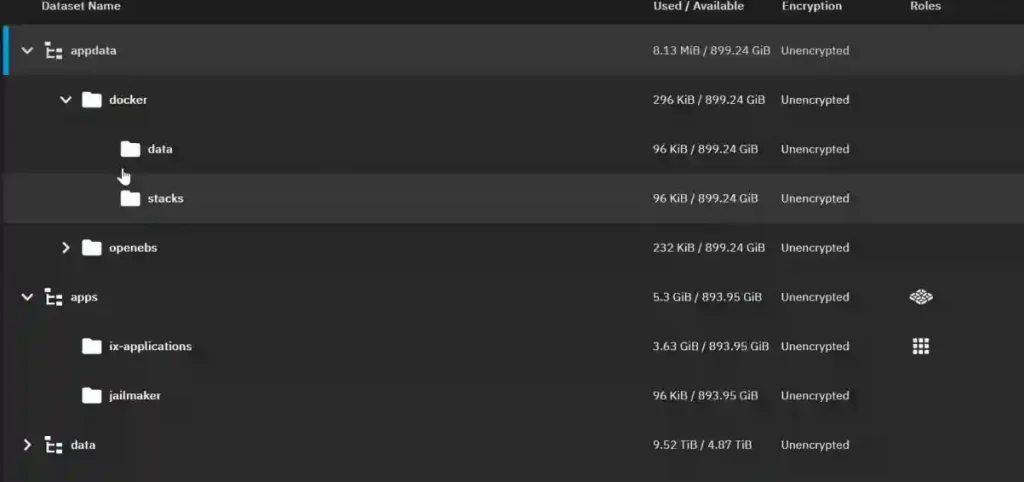
- Create datasets within the appdata pool for the app data.
- Create Docker Dataset:
- In the
appdatapool, set up a Docker dataset for Docker data.
- In the
- Create Additional Datasets:
- Create datasets named
dataand stacks for Docker.
- Create datasets named
- Setting Permissions
- Set the permissions for the Docker datasets to user apps (UID 568) and group apps (UID 568) with group write privileges. Apply these settings recursively if necessary.
- Create Docker Dataset:

Setting Up Docker
Docker Template Code
The Docker template code is stored in the Jailmaker repository under templates>Docker>config. Reproduced here:
startup=0
gpu_passthrough_intel=0
gpu_passthrough_nvidia=0
# Turning off seccomp filtering improves performance at the expense of security
seccomp=1

# Use macvlan networking to provide an isolated network namespace,
# so docker can manage firewall rules
# Alternatively use --network-macvlan=eno1 instead of --network-bridge
# Ensure to change eno1/br1 to the interface name you want to use
# You may want to add additional options here, e.g. bind mounts
systemd_nspawn_user_args=--network-bridge=br1
    --resolv-conf=bind-host
    --system-call-filter='add_key keyctl bpf'

# Script to run on the HOST before starting the jail
# Load kernel module and config kernel settings required for docker
pre_start_hook=#!/usr/bin/bash
    set -euo pipefail
    echo 'PRE_START_HOOK'
    echo 1 > /proc/sys/net/ipv4/ip_forward
    modprobe br_netfilter
    echo 1 > /proc/sys/net/bridge/bridge-nf-call-iptables
    echo 1 > /proc/sys/net/bridge/bridge-nf-call-ip6tables

# Only used while creating the jail
distro=debian
release=bookworm

# Install docker inside the jail:
# https://docs.docker.com/engine/install/debian/#install-using-the-repository
# Will also install the NVIDIA Container Toolkit if gpu_passthrough_nvidia=1 during initial setup
# https://docs.nvidia.com/datacenter/cloud-native/container-toolkit/latest/install-guide.html
initial_setup=#!/usr/bin/bash
    set -euo pipefail

    apt-get update && apt-get -y install ca-certificates curl
    install -m 0755 -d /etc/apt/keyrings
    curl -fsSL https://download.docker.com/linux/debian/gpg -o /etc/apt/keyrings/docker.asc
    chmod a+r /etc/apt/keyrings/docker.asc

    echo \
    "deb [arch=$(dpkg --print-architecture) signed-by=/etc/apt/keyrings/docker.asc] https://download.docker.com/linux/debian \
    $(. /etc/os-release && echo "$VERSION_CODENAME") stable" | \
    tee /etc/apt/sources.list.d/docker.list > /dev/null

    apt-get update
    apt-get install -y docker-ce docker-ce-cli containerd.io docker-buildx-plugin docker-compose-plugin

    # The /usr/bin/nvidia-smi will be present when gpu_passthrough_nvidia=1
    if [ -f /usr/bin/nvidia-smi ]; then
        curl -fsSL https://nvidia.github.io/libnvidia-container/gpgkey -o /etc/apt/keyrings/nvidia.asc
        chmod a+r /etc/apt/keyrings/nvidia.asc
        curl -s -L https://nvidia.github.io/libnvidia-container/stable/deb/nvidia-container-toolkit.list | \
        sed 's#deb https://#deb [signed-by=/etc/apt/keyrings/nvidia.asc] https://#g' | \
        tee /etc/apt/sources.list.d/nvidia-container-toolkit.list

        apt-get update
        apt-get install -y nvidia-container-toolkit

        nvidia-ctk runtime configure --runtime=docker
        systemctl restart docker
    fi

    docker info

# You generally will not need to change the options below
systemd_run_default_args=--property=KillMode=mixed
    --property=Type=notify
    --property=RestartForceExitStatus=133
    --property=SuccessExitStatus=133
    --property=Delegate=yes
    --property=TasksMax=infinity
    --collect
    --setenv=SYSTEMD_NSPAWN_LOCK=0

systemd_nspawn_default_args=--keep-unit
    --quiet
    --boot
    --bind-ro=/sys/module
    --inaccessible=/sys/module/apparmor
- Enter y <Enter> followed by Enter.
- Paste the template code from above.
- Change startup=0 to startup=1.
- Edit the network bridge line to match your interface:
- For simple interface: systemd_nspawn_user_args=–network-macvlan=eno1
- For bridge network: systemd_nspawn_user_args=–network-bridge=br0
- If using a GPU and need this available within Docker, set the appropriate variable to 1:
- gpu_passthrough_intel=1 or gpu_passthrough_nvidia=1
- After editing, press CTRL+X followed by y and Enter.
- Name the jail docker and press y to start the jail.
- The script will download the necessary files and unpack them to create a Debian jail.
Troubleshooting
- If the jail fails to start, review the network configuration by editing the config file:
- jlmkr edit docker
- Restart the jail: jlmkr restart docker
- To list running jails: jlmkr list
Setting a Fixed IP Address
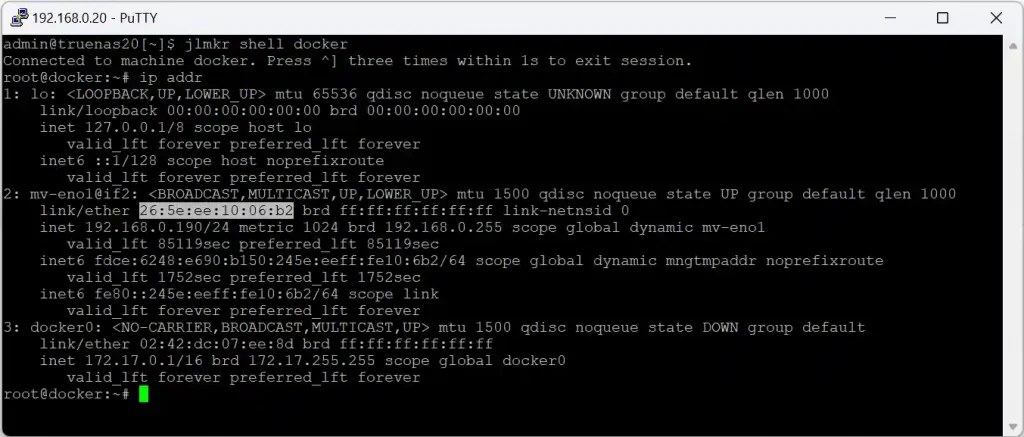
There are several ways of doing this but my preference is to use a static lease reservation in my DHCP server using the MAC address provided by ip addr.
- Find the jail’s IP address with ip addr.
- Find the MAC address provided by the output of ip addr (see below)
- Set DHCP reservation for the MAC address to your prefered IP address.


![A terminal window showing a command prompt with the text "admin@truenas20[~]$ jlmkr create" followed by a request for the sudo password and a warning message in yellow.](https://ryeroxley.com/wp-content/uploads/2024/06/image-7.webp)


